This Is Everything You Need To Know About Enamel Dials – Part 1
Jan 11, 2019

The art of enamel dials is almost as old as watchmaking itself. There is no other way of rendering colour with a lustrous, everlasting sheen that comes close to vitreous (or grand feu) enamel. At anOrdain, we’ve made enamel dials a cornerstone of our business, though it comes with its challenges. To better understand what’s involved, we’ve created this two-part series. This first instalment provides an in-depth explanation of enamel related to dial-making. The second takes a deep dive into the ‘grand feu’ fabrication process we use to make our enamel dials.
What is Enamel?
Enamel is a soft glass derived from silica mixed with other compounds such as red lead and soda ash. The raw materials are heated in a melting pot until they form a colourless, crystal-like liquid. By introducing other ingredients to the molten mix, a large variety of intense hues can be obtained. For example, adding cobalt produces a blue colour, chromium a green, iron a grey, and iodine a fiery red. After an average of 14 hours of fusing in the kiln, the coloured enamel is scooped out with a ladle and laid to cool. Either on a flat piece of cast iron (for transparent types), or in a cast iron mould (for opaque types).

The molten enamel sets as a glass-like plate. From here, it can be broken down to a crystal form, or more often ground into a rudimentary powder. Depending on what form it arrives in, the enamellist may have to use a mortar and pestle to grind the enamel to the desired consistency. This is harder than it sounds because the enamel must be ground to an exact fineness depending on the type and mode of application. anOrdain sources enamels from half a dozen manufactures, primarily in the UK and France. Most of the British ones comes from in and around Stoke-on-Trent. An area famous for its pottery glazes and dyes (whose processes share a commonality with enamel).
Enamel Dials
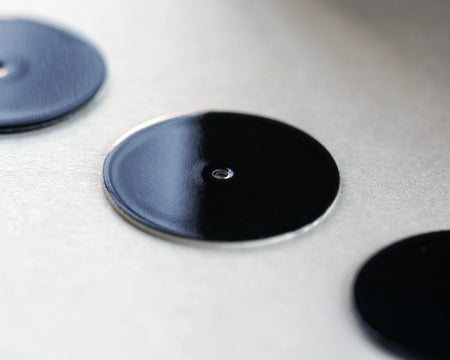
To make an enamel dial, the ground-up enamel is applied to a metal disc. Either by sieving it in an even layer, or by mixing the powder with water and brushing it across the surface. Through firing in an oven at 800 to 1,200℃, the enamel melts and flows into a smooth consistency that bonds with the metal. This is cooled and sanded flat. And then the process is repeated (up to eight times for an anOrdain enamel dial), building layers until the desired thickness and finish are achieved. In its final state, the enamel becomes an extremely hard-wearing material and takes on a vivid colour that never fades. On its own the thin enamel dial is fragile but protected in a watch case it can last forever.

Enamel dials first appeared around the end of the 17th century with the advent of the pocket watch. Wide use of the technique continued until the beginning of the 20th century. Including in the UK (who reigned as the global centre of watchmaking during the 18th century). Numerous historical examples still in existence attest to enamel’s everlasting quality. Eventually, enamel dials were replaced by metal ones as new methods of adding decorative colour became possible. Enamel dialling has since dwindled to become practised by only a handful of artisans mainly in Switzerland, and to a lesser extent Japan. Thus, enamel dials are usually reserved for exclusive, high-end luxury watches.
The Challenges of Working with Enamel for Watchmaking
Part of the reason for the decline in enamel dials is the challenging and time-consuming manufacturing process. The tolerances and finishes required for watchmaking make enamel dialling difficult and unforgiving. For example, the completed enamel dial for the anOrdain Model 1 needs to measure a uniform thickness of 1.15mm inclusive of the metal base, be perfectly flat, and flawless across its entire surface. Depending on the character of the colour, it takes between 6 and 9 layers of enamel to achieve the desired finish. Each layer needs to be fired, and each visit to the kiln introduces the potential for something to go wrong.

It’s not uncommon for a speck of debris from the kiln to land on the dial whilst being fired, or for the dial to crack at temperature. Bubbles may form on the surface, leaving it pocked with tiny holes, or there may be a problem with the colour itself. In each case, the enamel dial must be thrown out and started anew. The entire process - from cutting the copper blank, soldering on the dial feet, powdering, and sanding each layer until the final firing - is done by hand. It takes an experienced enamellist on average 8- 10 hours to produce a dial, with some colours being more problematic than others. The high rejection rate makes producing enamel dials a costly venture.
Types of Enamel and Which are Best for Dials
Enamels are categorised into two main types, which describe their appearance after firing. Opaque enamels form a solid colour that completely covers the underlying metal base. Transparent or translucent enamels behave more like stained glass. They leave the underlying metal visible. (Opal enamels fall somewhere in between). In developing Model 1, we have worked our way through hundreds of different enamels, looking for those which work best for dials. The choice of copper for the dial base has influenced this, leading us to focus on the opaque enamels.
In general, transparent enamels don’t work on copper as the metal blackens with the heat and that comes through making the dial dark and muddy. An exception to this is our Translucent Blue dial included in the Model 1 line-up (although this was quite challenging to perfect - read more here). Transparent enamels favour precious metals, such as silver. Attractive effects can be made by patterning the underlying metal prior to enamelling. In contrast, opaque enamels are pleasing for the consistency of their solid colour. Four of the five Model 1 options feature opaque enamels. These include the Iron Cream, Post Office Red, Pink and Hebridean Blue.
Now that you know everything you need to about enamel dials, be sure to check out part two. In that article, we look at how our dials are made using the ‘grand feu’ enamelling technique.


